- 1/2 yard fabric
- 1/3 yard fabric of 5 different prints
- 2 1/2 yards ric rac
- thread to match ric rac
- pins
- scissors
- rotary mat, ruler and cutter
- iron
- sewing machine
Step 1: Cut (1) 9 x 12 piece from the 1/3 yard pieces of fabric so you end up with a total of (5) 9 x 12 pieces.
Step 2: With right sides together pin the first two 9 x 12 pieces together.
Step 3: Sew the first two pieces together using a 1/4" seam allowance.
Step 4: Press the seam to one side. Repeat steps 2 through 4 until all (5) 9 x 12 pieces are sewn together. This is totally optional and I did not do this on this particular tablerunner. You can add ribbon, ric rac, lace, etc. anywhere on here before moving to step 5 if desired.
Step 5: Pin the sewn (5) 9 x 12 pieces to one side of the 1/2 yard of fabric.
Step 6: Sew the long side using a 1/4" seam allowance.
Step 7: Pin the raw edge side of the (5) sewn 9 x 12 pieces to the other side of the 1/2 yard of fabric right sides together. You can see that the yellow fabric which is the back and sides of the finished table runner is bigger and that is how it is supposed to be.
Step 8: Sew this long edge using a 1/4" seam allowance.
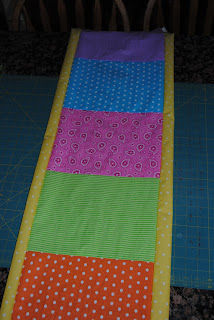
Step 9: Flip the tablerunner right side out. It will look like this with some border on both sides.
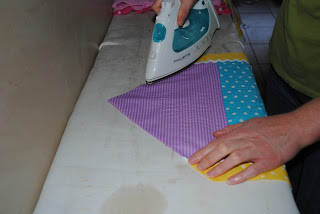
Step 10: This is the trickiest part of the whole thing and not too tricky if you are careful. You can eyeball it or measure as you go. DO NOT iron on one side and then do the other or else it will not be even. Do a small piece on one side and then do the same piece on the other side to ensure that you don't end up with uneven sides.
Once ironed it should look like this.
Step 11: Pin the ric rac on where the middle and border edges seams meet as pictured here. You don't have to pin, but I prefer to pin as ric rac slides off center easily when sewing. NOTE: you may use ribbon, lace, or any embellishment in place of ric rac that you choose.
Here is a closer look at the pinning of the ric rac.
Step 12: Sew down the center of the ric rac. This is why you will want to have a matching thread color. I used white thread for my entire project. Sew somewhat slowly so that your ric rac stays in place. Do this for both sides of the tablerunner.
Step 13: Trim the top and bottom edges even. I cut right next to where the ruler is placed.
Step 14: Fold the table runner in half lengthwise right sides together. Pin the top and bottom raw edges together. Just match the two side edges together. It does not matter if the ric rac matches up as it will get turned under in the end.
Step 15: Sew across the top edge using a 1/4" seam allowance. Repeat for the bottom edge.
Step 16: Turn right side out. Use blunt tip scissors or your finger to get the point out all the way. Be careful not to push too hard if using scissors as you can put a whole through it.
Step 17: Open out the tablerunner and put the sewn side underneath. It will form a triangle shape along the edges. Eyeball your triangle edges to get them as even as possible.
Step 18: Iron the triangle edges so that the edge is crisp and will keep its shape. Just a note: You can wash this tablerunner, but you will have to re-iron the triangle edges again. This is not a big deal to me. FINISHED!! Yea! And so easy too! Let me know what you think. 30 minutes for a cute tablerunner with lots of color just in time for easter.
I put my tablerunner on my kitchen table along with a vase of jellybeans, peeps and flowers.
 A closer look at the vase of candy and flowers. I have children and as you can see they have been tugging at the peeps. As a matter of fact some little peeps no longer have ears - I hid those in the back. In case you have never seen a tutorial on how to do the vase - it is a snap. Just buy two sizes of vases that fit inside of each other and allow enough room for the jellybeans and peeps. Fill the outside of your vase with the candy and the inside of the vase with the flower. How easy is that for cute!


